Posted by Brian Keeney on Aug 11th 2022
How To Loctite Firearm Components (or anything else where you care)
Bumper Sticker Message:
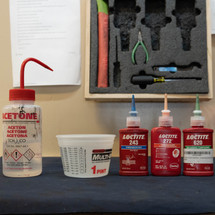
- Loctite 243 (blue) for semi permanent stuff, 272 (red) for permanent stuff, 620 for clamping the barrel with anything.
- Degrease the threads on both sides (male and female) prior to application
- Apply loctite to both threads (male and female).
- There are additional nuggets in the text and video, but you don't need to view both.
If you'd rather watch or listen to this blog:
A short survey of Loctite varieties
There are a LOT of Loctite part numbers out there, and it can be seriously overwhelming to find what you actually need. These are our picks for every armorer's chest:
- Loctite 243 BLUE is for semi-permanent installations. This should be your default go-to.
- Loctite 272 RED is almost forever-- heat will help to get it undone, but you shouldn't use it if you want the screw to come out again.
- Loctite 620 GREEN is a high temp, high strength bearing compound. This is what you want to use when you're clamping a barrel with anything-- Midwest, Ultimak, OCCAM.
Degreasing is Non-Optional
Degreasing both male and female threads (or bearing surfaces) with Acetone, brake cleaner (Autozone brand has magic in it), or similar is non-optional. All of these solvents are bad for your brain and skin, so use appropriate caution, and follow the warnings on the bottle.
The best degrease method we've found is to soak the parts for 5 minutes in used acetone, then a rinse with fresh acetone to wash away the contamination in the used acetone. Contamination, you say? Yes- the oil that you remove with the acetone just dissolves in the acetone. If you want to prove this to yourself, just degrease a bunch of screws and let the acetone flash off in a paint cup; you'll see a thin (or thick) residue of oil left over after the acetone has flashed off. A final rinse of new acetone will solve this problem. Using two paint cups, pouring just the acetone from one cup to the other at the end of degrease will minimize skin contact.
Wet, Not Dripping, Warm, Not Hot
At the risk of stating the obvious, the threadlocker only works where there are threads. Loctite cures anaerobically, meaning that it only sets up where there is no oxygen (don't ask me how the loctite at the bottom of the bottle knows that there's air above it!). That's why if you over apply it, it'll still be wet a few days later. So clean up your extra-- you'll either do it now or later on your clothes or gun bag. Loctite also will cure MUCH faster when temperatures are high. For reasonable cure times you want the parts around room temperature.
To wet out male threads, simply spread a small bead on the threads, like toothpaste on a brush. For female threads, put a single drop in the hole. If it's a blind (bottom) hole, use a degreased needle or wire to free the trapped air. By swirling the needle a bit you'll get good wetting-out of the threads. If it's a through hole, blow air gently on the bubble and it'll flow through the hole, leaving a very nicely prepped hole. Don't touch the part with your lips-- that's how you get monkeypox.
Don't be a Gorilla
This is outside the scope of loctite, but don't be a gorilla with torqueing screws. Grownups use torque drivers. Be a grownup. Also, Dicks Out for Harambe.
Thanks for Caring!
Thanks for taking the time to read my post. If you found this useful, please consider subscribing to our YouTube, Instagram, and Newsletter. We promise not to spam you or sell your information, and subscribing will ensure you see the next article we put out on armoring.

